

发布时间: 2019-07-25 15:16:59
本指南使用的是tf.keras,它是一种用于在 TensorFlow 中构建和训练模型的高阶 API。
from __future__ import absolute_import, division, print_function, unicode_literals
# TensorFlow and tf.keras
import tensorflow as tf
try:
import tensorflow.keras as keras
except:
import tensorflow.python.keras as keras
# Helper libraries
import numpy as np
import matplotlib.pyplot as plt
print(tf.__version__)
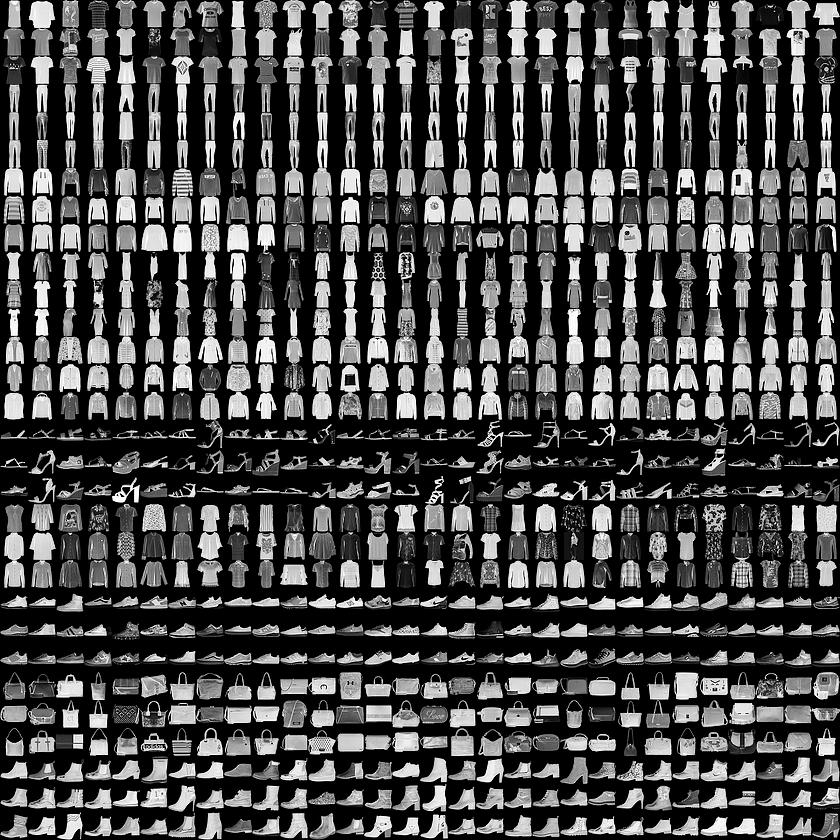
本指南使用Fashion MNIST <https://github.com/zalandoresearch/fashion-mnist>数据集,其中包含 70000 张灰度图像,涵盖 10 个类别。以下图像显示了单件服饰在较低分辨率(28x28 像素)下的效果:
Fashion MNIST sprite
Fashion MNIST 的作用是成为经典 MNIST 数据集的简易替换,后者通常用作计算机视觉机器学习程序的“Hello, World”入门数据集。MNIST数据集包含手写数字(0、1、2 等)的图像,这些图像的格式与我们在本教程中使用的服饰图像的格式相同。 train_images和train_labels数组是训练集,即模型用于学习的数据。
测试集 test_images 和 test_labels 数组用于测试模型。
图像为28x28的NumPy数组,像素值介于0到255之间。标签是整数数组,介于0到9之间。这些标签对应于图像代表的服饰所属的类别:
Label | Class |
0 | T-shirt/top(T 恤衫/上衣) |
1 | Trouser(裤子) |
2 | Pullover (套衫) |
3 | Dress(裙子) |
4 | Coat(外套) |
5 | Sandal(凉鞋) |
6 | Shirt(衬衫) |
7 | Sneaker(运动鞋) |
8 | Bag(包包) |
9 | Ankle boot(踝靴) |
class_names = ['T-shirt/top', 'Trouser', 'Pullover', 'Dress', 'Coat',
'Sandal', 'Shirt', 'Sneaker', 'Bag', 'Ankle boot']
我们先探索数据集的格式,然后再训练模型。以下内容显示训练集中有 60000 张图像,每张图像都表示为 28x28 像素:
train_images.shape
(60000, 28, 28)
同样,训练集中有60,000个标签:
len(train_labels)
60000
每个标签都是0到9之间的整数:
train_labels
array([9, 0, 0, ..., 3, 0, 5], dtype=uint8)
测试集中有10,000个图像。同样,每个图像表示为28 x 28像素:
test_images.shape
(10000, 28, 28)
测试集包含10,000个图像标签:
len(test_labels)
10000
在训练网络之前必须对数据进行预处理。 如果您检查训练集中的第一个图像,您将看到像素值落在0到255的范围内:
#预处理数据
plt.figure()
plt.imshow(train_images[0])
plt.colorbar()
plt.grid(False)
plt.show()
我们将这些值缩小到 0 到 1 之间,然后将其馈送到神经网络模型。为此,将图像组件的数据类型从整数转换为浮点数,然后除以 255。以下是预处理图像的函数:务必要以相同的方式对训练集和测试集进行预处理:
train_images = train_images / 255.0
test_images = test_images / 255.0
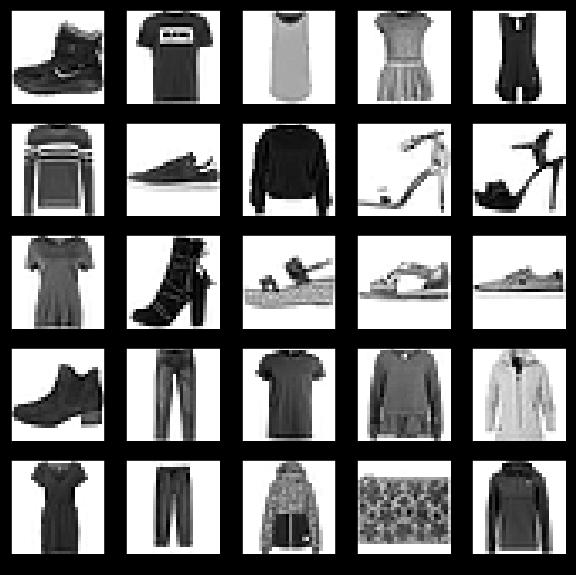
为了验证数据的格式是否正确以及我们是否已准备好构建和训练网络,让我们显示训练集中的前25个图像,并在每个图像下方显示类名。
plt.figure(figsize=(10,10))
for i in range(25):
plt.subplot(5,5,i+1)
plt.xticks([])
plt.yticks([])
plt.grid(False)
plt.imshow(train_images[i], cmap=plt.cm.binary)
plt.xlabel(class_names[train_labels[i]])
plt.show()
模型还需要再进行几项设置才可以开始训练。这些设置会添加到模型的编译步骤:
损失函数:衡量模型在训练期间的准确率。我们希望尽可能缩小该函数,以“引导”模型朝着正确的方向优化。
优化器:根据模型看到的数据及其损失函数更新模型的方式。
度量标准:用于监控训练和测试步骤。以下示例使用准确率,即图像被正确分类的比例。
model.compile(optimizer='adam',
loss='sparse_categorical_crossentropy',
metrics=['accuracy'])
model.fit(train_images, train_labels, epochs=5)
接下来,比较模型在测试数据集上的表现情况:
test_loss, test_acc = model.evaluate(test_images, test_labels)
print('\nTest accuracy:', test_acc)
输出:
10000/10000 [==============================] - 1s 50us/step
Test accuracy: 0.8734
结果表明,模型在测试数据集上的准确率略低于在训练数据集上的准确率。训练准确率和测试准确率之间的这种差异表示出现过拟合(overfitting)。如果机器学习模型在新数据上的表现不如在训练数据上的表现,也就是泛化性不好,就表示出现过拟合。
输出:
array([6.2482708e-05, 2.4860196e-08, 9.7165821e-07, 4.7436039e-08,
2.0804382e-06, 1.3316551e-02, 9.8731316e-06, 3.4591161e-02,
1.2390658e-04, 9.5189297e-01], dtype=float32)
预测结果是一个具有 10 个数字的数组,这些数字说明模型对于图像对应于 10 种不同服饰中每一个服饰的“confidence(置信度)”。我们可以看到哪个标签的置信度值较大:
np.argmax(predictions[0])
因此,模型非常确信这张图像是踝靴或属于 class_names[9]。我们可以检查测试标签以查看该预测是否正确:
test_labels[0]
我们可以将该预测绘制成图来查看全部 10 个通道
def plot_image(i, predictions_array, true_label, img):
predictions_array, true_label, img = predictions_array[i], true_label[i], img[i]
plt.grid(False)
plt.xticks([])
plt.yticks([])
plt.imshow(img, cmap=plt.cm.binary)
predicted_label = np.argmax(predictions_array)
if predicted_label == true_label:
color = 'blue'
else:
color = 'red'
plt.xlabel("{} {:2.0f}% ({})".format(class_names[predicted_label],
100*np.max(predictions_array),
class_names[true_label]),
color=color)
def plot_value_array(i, predictions_array, true_label):
predictions_array, true_label = predictions_array[i], true_label[i]
plt.grid(False)
plt.xticks([])
plt.yticks([])
thisplot = plt.bar(range(10), predictions_array, color="#777777")
plt.ylim([0, 1])
predicted_label = np.argmax(predictions_array)
thisplot[predicted_label].set_color('red')
thisplot[true_label].set_color('blue')
让我们看看第0个图像,预测和预测数组。
i = 0
plt.figure(figsize=(6,3))
plt.subplot(1,2,1)
plot_image(i, predictions, test_labels, test_images)
plt.subplot(1,2,2)
plot_value_array(i, predictions, test_labels)
plt.show()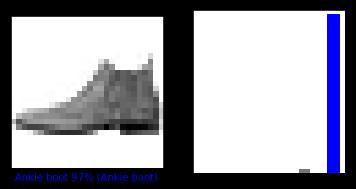
i = 12
plt.figure(figsize=(6,3))
plt.subplot(1,2,1)
plot_image(i, predictions, test_labels, test_images)
plt.subplot(1,2,2)
plot_value_array(i, predictions, test_labels)
plt.show()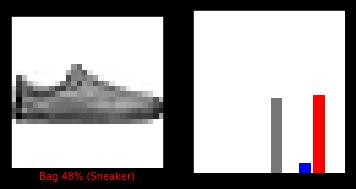
我们用它们的预测绘制几张图像。正确的预测标签为蓝色,错误的预测标签为红色。数字表示预测标签的百分比(总计为 100)。请注意,即使置信度非常高,也有可能预测错误。
# 绘制前X个测试图像,预测标签和真实标签。
# 用蓝色标记正确的预测,用红色标记错误的预测。
num_rows = 5
num_cols = 3
num_images = num_rows*num_cols
plt.figure(figsize=(2*2*num_cols, 2*num_rows))
for i in range(num_images):
plt.subplot(num_rows, 2*num_cols, 2*i+1)
plot_image(i, predictions, test_labels, test_images)
plt.subplot(num_rows, 2*num_cols, 2*i+2)
plot_value_array(i, predictions, test_labels)
plt.show()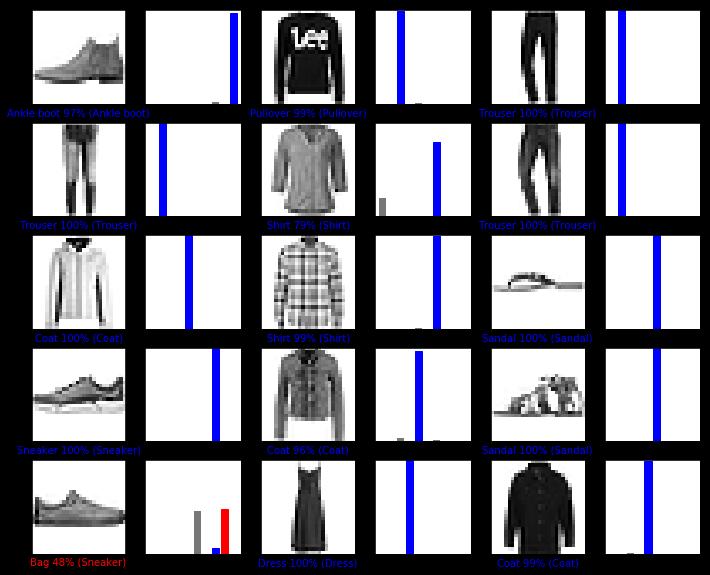
最后,使用训练的模型对单个图像进行预测。
# 从测试数据集中获取图像
img = test_images[0]
print(img.shape)
tf.keras模型已经过优化,可以一次性对样本批次或样本集进行预测。因此,即使我们使用单个图像,仍需要将其添加到列表中:
# 将图像添加到批次中,它是唯一的成员。
img = (np.expand_dims(img,0))
print(img.shape)
(1, 28, 28)
现在预测此图像的正确标签:
predictions_single = model.predict(img)
print(predictions_single)
plot_value_array(0, predictions_single, test_labels)
_ = plt.xticks(range(10), class_names, rotation=45)
model.predict返回一组列表,每个列表对应批次数据中的每张图像。(仅)获取批次数据中相应图像的预测结果:
np.argmax(predictions_single[0])
本实验利用网上已有的北京房价数据集预测了北京的房价,实现了TensorFlow的线性回归应用。