
发布时间: 2017-06-16 15:22:16
据不完全统计,现在市面上所有的Android手机都用电源键来手动锁屏。一天之内手动锁屏的次数绝对不少于30次。如果都用电源键来进行的话,那么电源键的使用寿命一定不会长久。虽然现在有一些桌面软件都集成了一键锁屏,但是要安装这些软件就必须安装它们的其他组件,这点很不爽,因为它们会自动更新或者在后台运行一些我不想要的东西。所以腾科小编决定自己写一个锁屏程序。经过在android开发文档里面的查找,小编发现从android 2.2开始,API里面就包含了一个lockNow方法(android.app.admin.DevicePolicyManager包中),接下来,让我们一起看看如何实现吧。

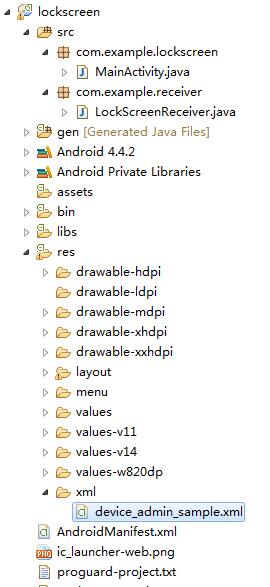
package com.example.lockscreen;
import android.app.Activity; import android.app.admin.DevicePolicyManager; import android.os.Bundle; import android.view.View;
public class MainActivity extends Activity {
private DevicePolicyManager deviceManager; @Override protected void onCreate(Bundle savedInstanceState) { super.onCreate(savedInstanceState); setContentView(R.layout.activity_main); deviceManager = (DevicePolicyManager)getSystemService(DEVICE_POLICY_SERVICE); }
public void lockScreen(View view){ deviceManager.lockNow(); } } |
<?xml version="1.0" encoding="utf-8"?> <RelativeLayout xmlns:android="http://schemas.android.com/apk/res/android" xmlns:tools="http://schemas.android.com/tools" android:layout_width="match_parent" android:layout_height="match_parent" android:paddingBottom="@dimen/activity_vertical_margin" android:paddingLeft="@dimen/activity_horizontal_margin" android:paddingRight="@dimen/activity_horizontal_margin" android:paddingTop="@dimen/activity_vertical_margin" tools:context="com.example.lockscreen.MainActivity" > <Button android:layout_width="wrap_content" android:layout_height="wrap_content" android:onClick="lockScreen" android:text="一键锁屏" />
</RelativeLayout> |
package com.example.receiver;
import android.app.admin.DeviceAdminReceiver; import android.content.Context; import android.content.Intent;
public class LockScreenReceiver extends DeviceAdminReceiver {
@Override public void onReceive(Context context, Intent intent) { // TODO Auto-generated method stub super.onReceive(context, intent); } } |
<?xml version="1.0" encoding="utf-8"?> <manifest xmlns:android="http://schemas.android.com/apk/res/android" package="com.example.lockscreen" android:versionCode="1" android:versionName="1.0" > <uses-sdk android:minSdkVersion="14" android:targetSdkVersion="21" /> <application android:allowBackup="true" android:icon="@drawable/ic_launcher" android:label="@string/app_name" android:theme="@style/AppTheme" > <activity android:name=".MainActivity" android:label="@string/app_name" > <intent-filter> <action android:name="android.intent.action.MAIN" /> <category android:name="android.intent.category.LAUNCHER" /> </intent-filter> </activity> <receiver android:name="com.example.receiver.LockScreenReceiver" android:description="@string/sample_device_admin_description" android:label="@string/sample_device_admin" android:permission="android.permission.BIND_DEVICE_ADMIN" > <meta-data android:name="android.app.device_admin" android:resource="@xml/device_admin_sample" /> <intent-filter> <action android:name="android.app.action.DEVICE_ADMIN_ENABLED" /> </intent-filter> </receiver> </application>
</manifest> |

package com.example.lockscreen; import android.app.Activity; import android.app.admin.DevicePolicyManager; import android.content.ComponentName; import android.content.Intent; import android.os.Bundle; import android.view.View; import com.example.receiver.LockScreenReceiver; public class MainActivity extends Activity { private DevicePolicyManager deviceManager; @Override protected void onCreate(Bundle savedInstanceState) { super.onCreate(savedInstanceState); setContentView(R.layout.activity_main); deviceManager = (DevicePolicyManager)getSystemService(DEVICE_POLICY_SERVICE); }
public void lockScreen(View view){ ComponentName who = new ComponentName(this, LockScreenReceiver.class); if(deviceManager.isAdminActive(who)){ deviceManager.lockNow(); }else{ openAdminDevice(who); } }
private void openAdminDevice(ComponentName who) { // TODO Auto-generated method stub // Launch the activity to have the user enable our admin. //激活管理员设备意图 Intent intent = new Intent(DevicePolicyManager.ACTION_ADD_DEVICE_ADMIN); //激活组件名 intent.putExtra(DevicePolicyManager.EXTRA_DEVICE_ADMIN, who); //激活说明 intent.putExtra(DevicePolicyManager.EXTRA_ADD_EXPLANATION,"激活我可以一键锁屏"); startActivity(intent); } } |
怎么样,学会了吗?如果你有更好的办法,欢迎你访问腾科官网(http://www.togogo.net)发表您的观点。
上一篇: {Oracle数据库}EXPDP报错ORA-39171、ORA-01691解决方法
下一篇: {H5开发}组件tab选项卡